Pages

Sunday 20 April 2014

Innocence and Beauty

 
ValerieTaborSmithOhWowCG_VALERIE
 
MATERIALS
 
A suitable tube – I have permission to use this gorgeous image which is the work of Valerie Tabor Smith HERE 
Made by myself : Background HERE
Font used: Annabelle JF
Quotation is by William Butler Yeats
 
PLUGINS
Simple – Pizza Slice Mirror
Adjust – Variations
 
Open the Background, duplicate using Shift+D and close out the original
Copy your tube and Paste as a New Layer
Image Resize / Resize All Layers unchecked / Resize 85%
Move left and down aligning the straight edge of the tube with the bottom of your working image
Effects / 3D Effects / Drop Shadow 4 / 4 / 75 / 35 / #78885c

Open a New Raster Layer and Flood Fill with White #ffffff
Selections / Select All
Selections / Modify / Contract / 3 pixels & Press Delete on your keyboard
Selections / Invert
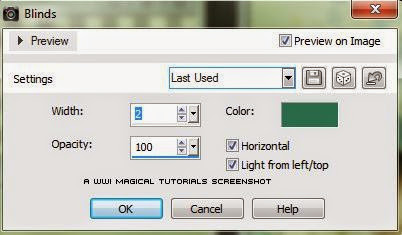
Effects / Texture Effects / Blinds / Settings below / Colour is #2c755b
SS01
Repeat the Blinds effect but this time remove the check mark from the Horizontal box
Selections / Select None

Layers / Merge / Visible
Edit / Copy and Paste as a New Layer
Close the eye of the Top Layer
Activate the bottom layer and Adjust / Blur / Gaussian Blur 3
Effects / Plugins / Simple / Pizza Slice Mirror
Repeat the Pizza Slice Mirror twice more
Effects / Edge Effects / Enhance

Open the eye of the top layer and activate the layer
Image / Resize / Resize all Layers unchecked / Resize by 80%
Effects / 3D Effects / Drop Shadow / 4 / 4 / 75 / 35 / #78885c
Repeat the Drop Shadow but change the Vertical and Horizontal to –4

Open a New Raster Layer
Flood Fill with #cae4bd
Selections / Select All
Selections / Modify / Contract / 10 pixels
Press Delete on your keyboard
Selections / Invert

Effects / Texture Effects / Blinds / Apply the same as previously – once with both Horizontal and Light from left/top checked and then again without the Horizontal checked
Selections / Select None
Effects / 3D Effects / Drop Shadow / 2 / 2 / 62 / 5 / #78885c
Repeat, changing the Vertical and Horizontal to –2

Image / Resize / Resize All Layers checked / Resize to 600 pixels width
Add your quotation – I used font Annabelle JF
Add Drop Shadow 2 / 2 / 62 / 5 / #3d8284

Add your artist’s copyright information and licence #, if applicable

Return to your tube and copy and paste as a New Image
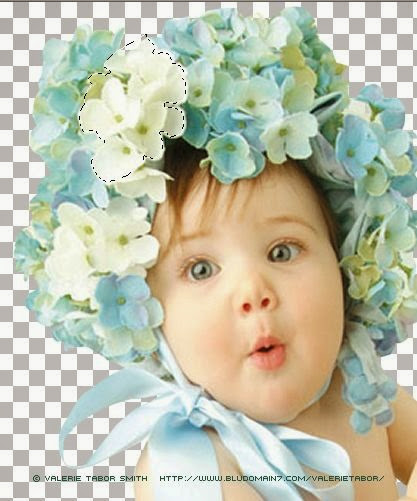
Zoom in and using your Freehand Selection Tool / Lasso go around some flowers carefully like this
SS1
Copy and Paste as a New Layer onto your working image
Duplicate this layer 4 times and Mirror the 2nd and 4th copies
I used Adjust / Variations to alter the colours of some layer
Then arrange the flowers, to make a pleasing group
Add a slight drop shadow to each layer and close all the other layers and Merge Visible
Open all the layers
On your Merged Flowers Layer add a Drop Shadow 2 / 2 / 45 / 10 / #3d8284
Add your name and Drop Shadow 2 / 2 / 62 / 5 / #78885c
All finished!

Saturday 19 April 2014

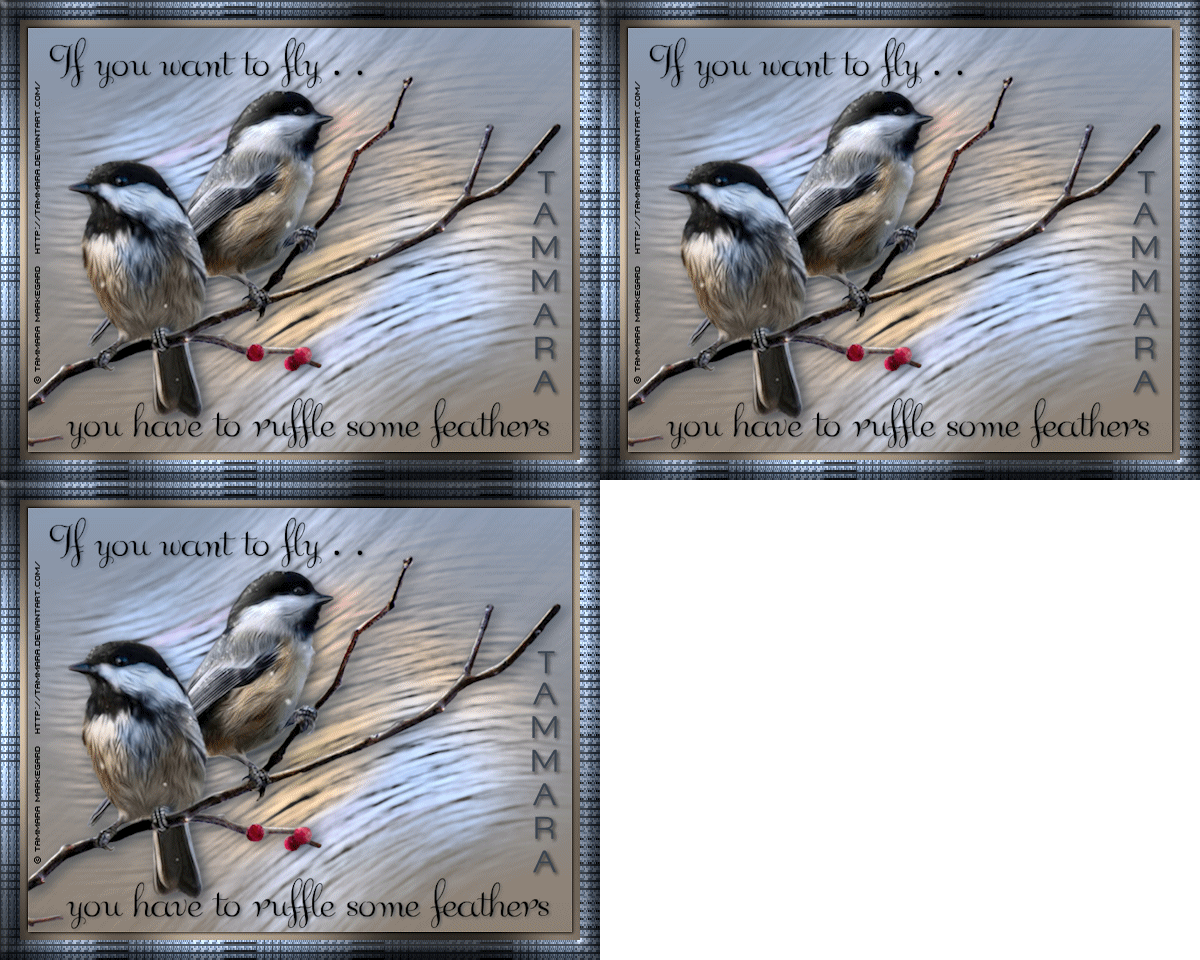
Ruffled Feathers


TammaraMarkegardTheHolidaySerenaceCG_TAMMARA
 
 
This tutorial was written by a WWI Magical Tutorials owner on 19th April 2014 and is the result of an entirely original idea
 
MATERIALS
The tutorial was written specifically for The Holiday Serenade from an image by Tammara Markegard who has generously granted permission to use this image in a tutorial   
Fonts used: Chikita and Street Corner Thin
 
PLUGINS
Flaming Pear – Twist and Tachyon
Graphics Plus – Cross Shadow
Eye Candy 4000 – Jiggle
Effecto Italian Editors Generatore – Pattern Tovaglia
 
Open a New Transparent Raster Image 700 x 550
Set your foreground colour to #8e8171 and your background to #8b9cb2

Make a Foreground Gradient / Linear / Angle 180 / Repeats 0 / Invert checked
Flood Fill the image with the gradient
Copy your tube and Paste as a New Layer

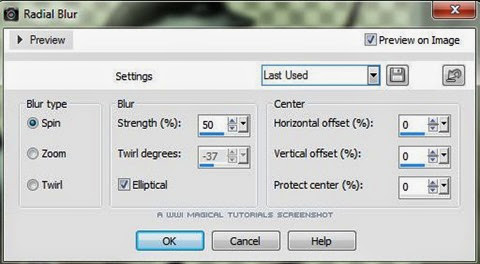
Adjust / Blur / Radial Blur / Settings below
SS01
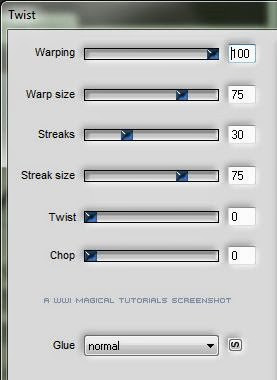
Effects / Plugins / Flaming Pear / Twist / Settings Below
Ss02
Layer / Duplicate
Effects / Plugins / Flaming Pear / Tachyon
Set the Blend Mode of this layer to Dodge and the Opacity to 87
Duplicate this layer
Image / Mirror
Image / Flip

Activate Raster 2
Duplicate this layer
Image / Mirror and Image / Flip
Move up the Copy of Raster 2 layer (Mirrored Twist Layer) so that it is under your top layer (Mirrored Tachyon Layer)

Activate your top layer
Copy your tube and Paste as a New Layer
Image / Resize / Resize all Layers unchecked / Resize by 75%
Move to the left so the twigs are on the edge of your image
Effects / 3D Effects / Drop Shadow / 4 / 6 / 85 / 25 / Colour #38424d

Now we are going to prepare for our animation if you don’t want to animate then you can omit the next steps from * to ***
* Duplicate your tube layer twice to make 3 layers in all
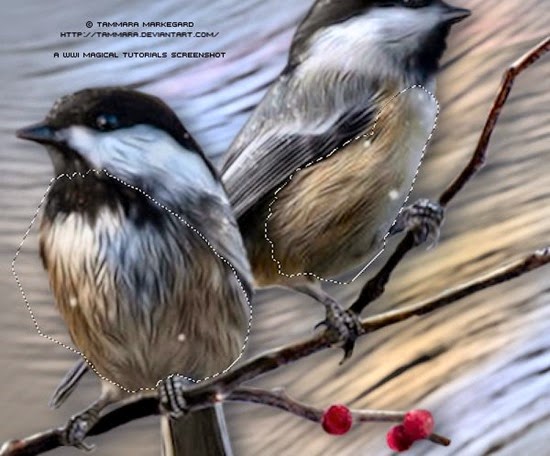
On the bottom one of your tube layers use your Freehand Selection Tool / Lasso to go carefully around the feathers of the two birds like this
SS1
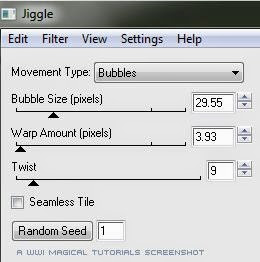
Effects / Plugins / Eye Candy 4000 / Jiggle / Settings below
SS3
Move up to the next layer
Apply the Jiggle again leaving the settings the same but pressing the Random Seed button
Repeat this on the top layer pressing the Random Seed button again
Selections / Select None
Close the eyes of the top two layers  ***

Type your quotation – I used Chikita font and added Drop Shadow 2 / 2 / 62 / 5 / Black

Open a New Raster Layer and Flood Fill with your Foreground Colour
Selections / Select All
Selections / Modify / Contract / 10 pixels / Press Delete on your keyboard
Selections / Invert
Effects / Plugins / Graphics Plus / Cross Shadow / Default settings

Selections / Invert / Drop Shadow / 2 / 2 / 62 / 5 / Black then repeat with Vertical and Horizontal settings at -2
Selections / Select All
Image / Crop to Selection
Selections / Select All
Image / Canvas Size 750 x 600 / Press the Central Diamond
Selections / Invert
Flood Fill the selection with the background colour
Effects / Plugins / Italian Editors Generatore / Pattern Tovaglia / Default Settings
Adjust / Hue and Saturation / Colorize / 152 / 52
Optional: Apply the Graphics Plus / Cross Shadow / Default Settings

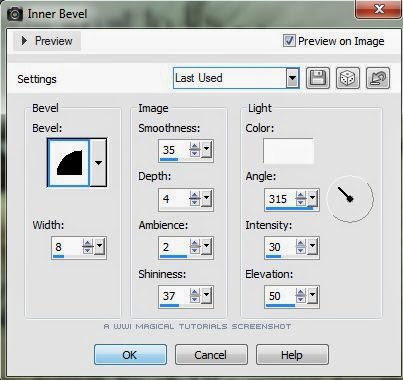
Effects / 3D Effects / Inner Bevel / Settings below
SS4

Image / Resize / Resize all layers checked / Resize to 600 pixels wide
Add your artist’s copyright information and your licence #, if applicable
Add your name – I used Street Corner Thin font
Now we are ready to animate our tag – you can, of course finish here
ANIMATION
Copy Merged and take into Animation Shop and Paste as a New Animation
Return to PSP
Close the eye on the bottom of your 3 tube layers and open the eye of the middle layer
Copy Merged and take into Animation Shop
Click on Frame 1 and Paste after the Current Frame
Return to PSP

Close the eye of the middle of your 3 tube layers and open the eye of the top tube layer
Copy Merged and take into Animation Shop
Click on Frame 2 and Paste after the Current Frame
Edit / Select All Frames
Animation / Frame Properties / Set speed to 25
Save as a GIF and we are done!

Friday 18 April 2014

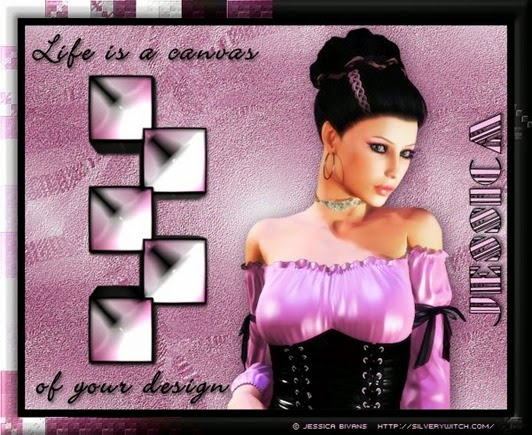
Life is a canvas

 
JessicaBivansSweetVioletCG_JESSICA
 
MATERIALS
 
A suitable tube – I have permission to use this image by Jessica Bivans HERE
Fonts used : Bickley Script and Retro Elite
 
PLUGINS USED
VM Distortion – Slicer
Simple – Diamond
FM Tile Tools – Blend Emboss
Eye Candy 5 Impact – Extrude
Flaming Pear – Lacquer
Background Designer – Bkg Designer sf10 I – Bee Morph
 
Open a New Transparent Raster Image 700 x 550 – we will resize later
Set your foreground colour to #bd6096 and your background colour to #ffffff or use colours from your own tube if not using the same one
Make a foreground gradient Linear / Angle 45 / Repeats 1 / Invert unchecked
Flood Fill your image with the gradient
 
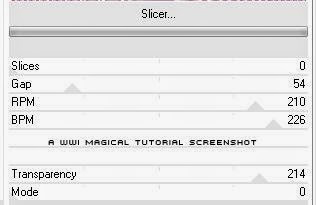
Effects / Plugins / VM Distortion / Slicer / Settings below
SS1
Effects / Plugins / Simple / Diamonds
Effects / Plugins / VM Distortion / Slicer / Default Settings
Effects / Plugins / Simple / Diamonds

Duplicate the layer
Image / Mirror
Effects / Plugins / Simple / Diamonds
Set the Blend Mode to Multiply and the Opacity to 85
FM Tile Tools / Blend Emboss / Default Settings
Repeat the Blend Emboss

Copy your tube and Paste as a New Layer
Image / Resize / Resize all Layers unchecked / Resize by 70% or if you are using an alternative tube so that it becomes a size similar to mine
Move over to the right hand side of your tag
Effects / 3D Effects / Drop Shadow 4 / 4 / 75 / 35 /  Colour #50233f or to suit your tube

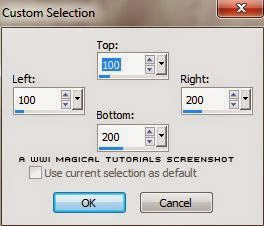
Open a New Raster Layer and make a Custom Selection
SS2
Flood Fill with the gradient – Keep the Selection
Open A New Raster Layer
Selections / Modify / Select Selection Border / Inside / 2 pixels
Flood Fill with Black or a suitable colour from your tube
Selections / Select None
Effects / 3D Effects / Drop Shadow / 2 / 2 / 62 / 5 / Black
Layers / Merge / Merge Down

Duplicate the Merged Layer 4 times to make 5 layers in all
Mirror the Copy Layer and the Copy 3 Layer
Now activate your Raster Deform / Pick Tool
Activate Copy of Raster 3
Look at your Tool Options Bar and move the X Position to 177 and the Y Position to 177
Activate Copy (2) of Raster 3
Move the X Position to 97 and the Y Position to 267

Activate copy (3) of Raster 3
Move the X Position to 177 and the Y Position to 347

Finally Activate Copy (4) of Raster 3
Move the X Position to 97 and the Y Position to 437

Close the Tube layer and the 2 background layers
Layers / Merge / Merge Visible
Open up the tube layer and the 2 background layers
Now move up so they are centralised vertically on your tag

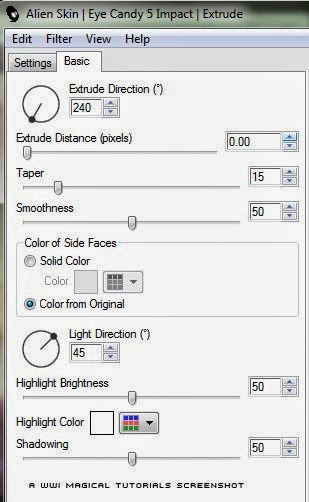
Effects / Plugins / Eye Candy 5 Impact / Extrude / Settings Below
SS3
 
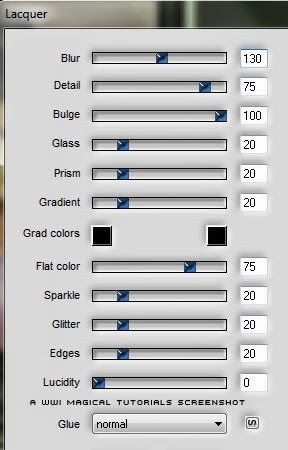
Effects / Plugins / Flaming Pear / Lacquer / Settings Below
SS4
Add Drop Shadow 2 / 2 / 62 / 5 / Black
Add a New Raster Layer and Selections / Select All
Flood Fill with Black or a dark colour from your tube
Selections / Modify / Contract / 10 pixels
Press Delete on your keyboard

Selections / Select All
Image / Canvas Size / 750 x 600 / Press the centre diamond
Selections / Invert
Open a New Raster Layer and Flood Fill with with gradient
 
Effects / Plugins /  Bkg Designer sf10 I – Bee Morph / Default Settings
FM Tile Tools / Blend Emboss
Repeat the Blend Emboss
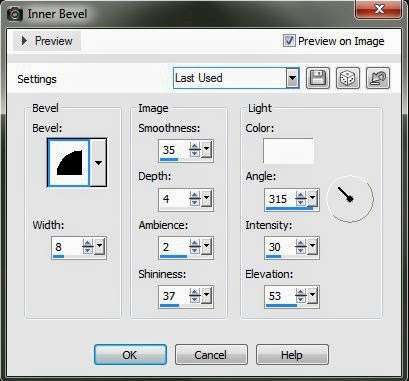
Effects / 3D Effects / Inner Bevel / Settings Below
SS5
Selections / Select None
Image / Resize / Resize all Layers checked / Resize to 600 pixels wide
Resize your Merged Layer (the 5 squares) only by 90%
Add your quotation and the same Drop Shadow
Add your artist’s copyright information and licence # if applicable on the dark part of the frame
Add your name in a pretty font – I used Retro Elite

And we have finished our tag


Saturday 12 April 2014

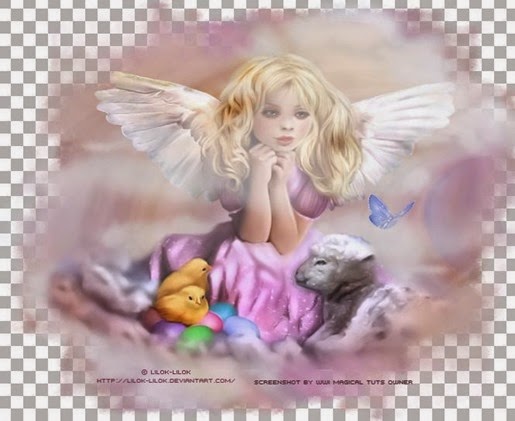
Easter Blessings


Lilok-LilokEasterBlessingsCG_BLESSINGS
 
This tutorial was written by a WWI group owner and, if there is any similarity or resemblance to any other tutorial, then that is purely a coincidence.  
 
MATERIAL
I have permission to use this beautiful image from Lilok-Lilok whose work you can view HERE   Do not use Lilok’s work unless you have permission.
A mask of your choice
WWIMagicalTutsBlessingsBackground.jpg
WWIMagicalTutsBlessingsWArt.pspimage
and
WWIMagicalTutsCloudAnimation.mng 
All the supplies are made by myself  HERE
Font used: Mr. Leopolde – not supplied

PLUGINS USED
None
 
 
Open the WWIMagicalTutsBlessingsBackground and the WWIMagicalTutsBlessingsWArt.pspimage
Duplicate the Background using Shift+D and close out the original – the result will be our working image
Layers / New Mask Layer / From Image / Find your chosen mask and press Ok
Merge / Merge Group
Duplicate this layer
Image / Mirror
Image / Flip
Copy your tube and Paste as a New Layer
Image / Resize / Resize All Layers unchecked / Resize by 75%
Copy Merged and take into Animation Shop and Paste as a New Animation
Ctrl+L until you have 14 frames in total and Edit / Select All
Open the WWIMagicalTutsCloudAnimation.mng and Edit / Select All
Slide Frame 1 of the Cloud Animation onto Frame 1 of your tag positioning the top cloud so that it obscures her face as below
Ss1
Now return to PSP and Copy the WWIMagicalTutsBlessingsWordArt.pspimage
Return to Animation Shop and Paste as a New Animation
Ensure that you have all frames of your tag selected
Edit / Propagate Paste
Now move your word art into position on Frame 1 and it should appear on all the other frames
Animation / Resize / Resize to 600 pixels wide
Now we can add our artist’s copyright information and licence # if applicable without any danger of it becoming distorted during resizing.
Prepare the copyright in PSP, Copy and take into Animation Shop and Paste as a New Animation.
Again, ensure that all frames of your tag are selected
then slide onto Frame 1 in a suitable position
Animation / Frame Properties / Set to 20
Animation / Animation Properties / Set to Opaque and White
 
Finally add your name or some other greeting of choice made in PSP and brought into Animation Shop as in the procedure for the copyright above.
That’s all – you have finished your Easter Blessings tag
We hope you have enjoyed this tutorial


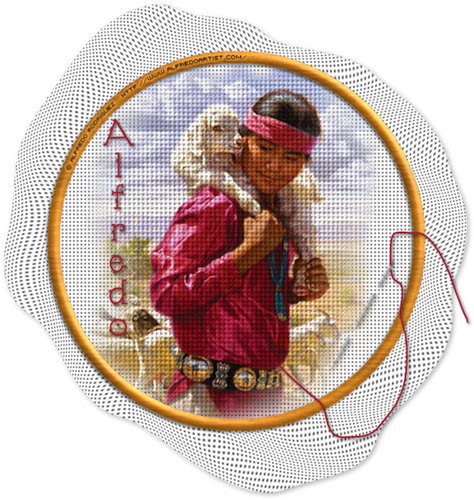
Cross Stitch Tag


AlfredoRodriguezLightLoadCG_ALFREDO
 
This tutorial was written by a WWI group owner and, if there is any similarity or resemblance to any other tutorial, then that is purely a coincidence.  
MATERIALS
You will need a suitable mist - I have permission to use this beautiful mist by Alfredo Rodriguez whose gallery you can find HERE
My EmbroideryCanvasCG HERE
A wood pattern or you can use Eye Candy 4000 – Wood or Eye Candy 5 Textures Wood
Font Used  - D J Dash – not supplied
PLUGINS
Eye Candy 5 – Textures – Weave
Eye Candy 5 Impact – Brushed Metal
Optional Eye Candy 5 – Textures – Wood OR Eye Candy 4000 – Wood if not using a wood Pattern
 
 
We will be making the frame, making and shaping the canvas and even making our own needle for this project.    
Place your wood pattern into your Patterns file if using a Pattern to make the frame
Place my EmbroideryCanvasCG in your texture file
 
Open a New Transparent Raster Image 700 x 700
Using your Preset Shape Tool set on circle and Background Colour set to White Foreground Null
Draw out a circle 500 x 500
Objects / Align / Centre in Canvas
Convert to Raster Layer

Click on the White circle with your Magic Wand
Selections / Modify / Select Selection Borders / 15
Promote Selection to Layer

Flood Fill with your Wood Pattern or use Eye Candy Wood for an effect you like

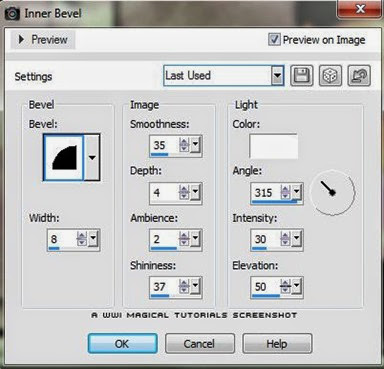
Effects / 3D Effects / Inner Bevel / Settings Below
SS1
Effects / 3D Effects / Drop Shadow / 2 / 2 / 62 / 5 / Black
 
Now with White in your Background and your Foreground set to Null again
Draw a larger circle – about 600 x 600
Objects / Align / Centre in Canvas
Convert to Raster Layer

Arrange this layer under your smaller white circle
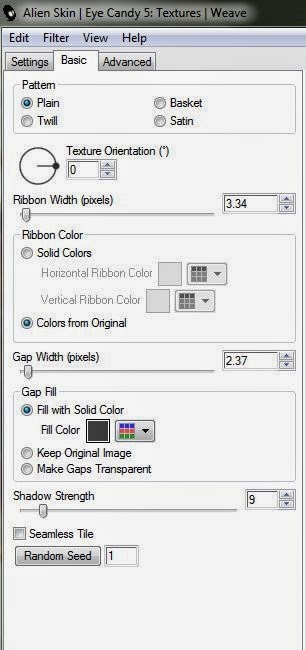
Effects / Eye Candy 5 Textures / Weave / Settings Tab – Choose Plain, Solid Fill
Basic Tab Settings Below – Fill Colour is #404040
SS2
Apply this same Weave to the Smaller White Circle Layer
We now need to drape the canvas around the sides
Activate your Large Circle Layer (Raster 3)
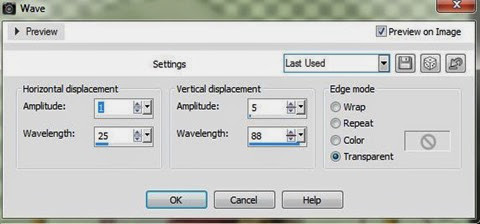
Effects / Distortion Effects / Wave / Settings Below
SS2a
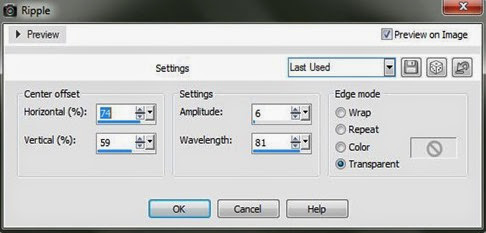
Effects / Distortion Effects / Ripple / Settings Below
Horizontal 74 / Vertical 59 / Amplitude 6 / Wavelength 81
SS3

Effects / 3D Effects / Drop Shadow / 2 / 2 / 35 / 10 / Black
 
Activate Raster 2
Copy your mist and Paste as a New Layer
Image / Resize / Resize All Layers unchecked / Resize so it fits nicely in the small circle
If using the same mist Resize by 50%
Activate your wooden frame layer and click inside with your Magic Wand
Selections / Modify / Expand / 12
Selections / Invert
Now activate your mist layer and press Delete on your keyboard
Selections / Select None
 
Duplicate your mist layer
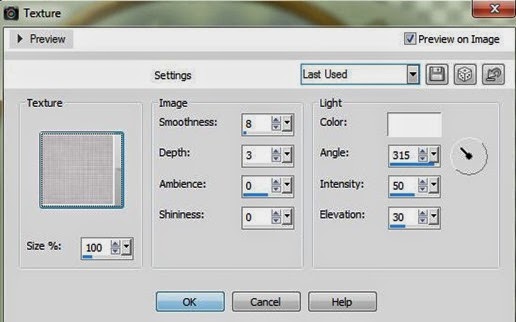
Effects / Texture Effects / Texture / Find your EmbroideryCanvasCG Texture / Settings Below
SS4
Set the Opacity of this Layer to 85%
Now we are going to make our needle
Foreground set to Null and Background set to White #ffffff
With your Preset tool set on Rectangle draw a very thin rectangle like this
SS6
 
Convert to Raster Layer
Effects / Eye Candy 5 Impact / Brushed Metal / Setting – Linear Steel Darker / Default
Take your Freehand Selection Tool / Lasso and draw around to give a point to the needle like this
SS7
Press Delete on your keyboard
Effects / 3D Effects / Inner Bevel / Same Settings as we used for the frame
Copy and Paste as a New Layer onto your tag
Use your Eraser to erase 2 parts to make it look like it’s threaded through the canvas
Add the same Drop Shadow
 
Using a colour from your mist type your name
Add Drop Shadow 2 / 2 / 62 / 5 /  Black
Move into position
 
Using your Pen Tool set on Width 2.52 and using the same colour in your Foreground and your background set to null choose Freehand on the Tool Options bar

Draw a line from some part of the mist around through the none pointed end of the needle and leave a tail
 
With your Eraser set on size 4 erase a small part of the cotton trail so it looks like it’s going through the eye of a needle
Add the same Drop Shadow

Crop / Merged Opaque
Image Resize / Resize All layers checked / Resize to 600 on the longest side

Add your artist’s copyright information and your licence # if applicable

Save as a PNG file and you’ve made your Cross Stitch tag


Friday 21 March 2014

When the music stops

 
AdrieJanssenStarkWhenTheMusicStopsCG_ADRIE
 
 
This tutorial was written by a WWI group owner and, if there is any similarity or resemblance to any other tutorial, then that is purely a coincidence.  


MATERIALS
I have permission to use this beautiful tube from Adrie Janssen-Stark whose site you can find HERE
My Selections HERE
 
PLUGINS
&>Bkg -  Kaleidoscope
L & K’s - Palmyre
Simple
AP01 Lines - Silver Lining
MuRa’s Meister – Perspective Tiling
 
Please Note – This tutorial is written specifically for this tube and colours
If you are using an alternative you may have to experiment with the Blend Modes and Opacities
If you are using the same tube set your foreground material to #c0c0c0
Set your background material to #494d58
Save the Selection Files in your Selections Folder in PSP

Open a New Transparent Raster Layer 700 x 550
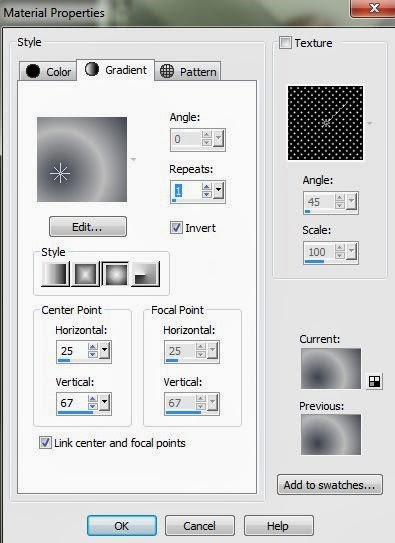
Make a Foreground / Background Sunburst gradient as follows
SS01
Flood Fill your image with the Gradient
Adjust / Blur / Gaussian Blur / 26
Effects / Plugins / &<Bkg Kaleidoscope / @Blueberry Pie / Default
Layer / Duplicate

Image / Mirror and then Image / Flip
Set the Opacity of this layer to 50%
Effects / Edge Effects / Enhance
Layers / Merge / Merge Down

Open a New Raster Layer
Selections / Load/Save Selections / Load Selection From Disk / Find CazMusicStopSel#1
Flood Fill the Selection with your background colour
Effects / Plugins / L & K / Palmyre / 255 / 7
Set the Opacity of this layer to Soft Light

Duplicate the Layer
Selections / Select None
Effects / Plugins / Simple / Left Right Wrap
Set the Blend Mode to Overlay and the Opacity to 80%
Effects / 3D Effects / 0 / 0 / 50 / 25 / Black
Repeat Drop Shadow on Raster 2

Activate Raster 1
Selections / Load/Save Selections / Load Selections From Disk / Find CazMusicStopsSel#2
Promote the Selection to Layer
Selections / Select None

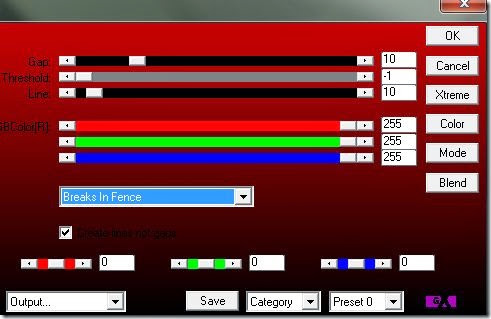
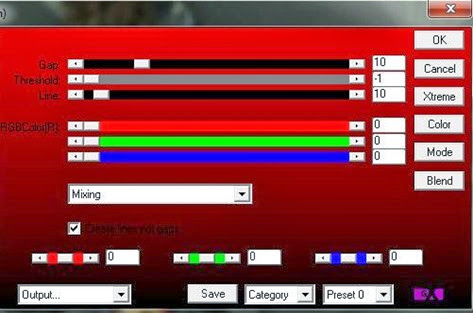
Effects / Plugins / AP Lines / Silver Lining / Settings below
10 / –1 / 10 / 255 / 255 / 255 / Breaks In Fence
SS1
Layer / Duplicate
Image / Flip
Layers / Merge / Merge Down
Add the same Drop Shadow

Activate the top layer
Layers / Merge / Merge Visible
Layers / Duplicate
Effects / Plugins / MuRa’s Meister / Perspective Tiling / Default
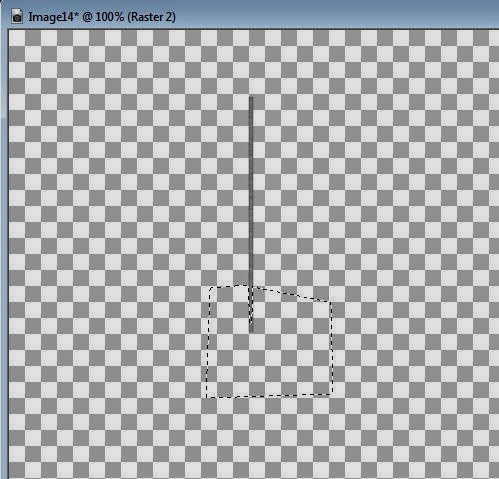
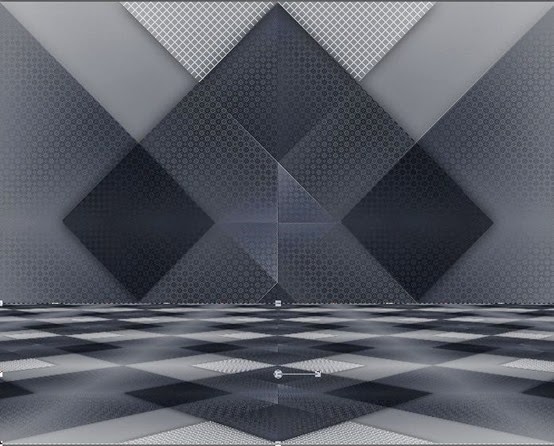
Using your Raster Deform / Pick Tool Pull down the Central Top Node until it is just below the dark small squares – see below
SS2
Press Ctrl and grab the Left Hand Top Node and move it to the bottom of the left hand dark square – see below
Ss3
Add the same Drop Shadow to the Floor Layer

Copy your tube and Paste as a New Layer
Resize / Resize All Layers unchecked / Resize by 55% if using same tube
Move into position on the left – see my example
Effects / 3D Effects / Drop Shadow / 4 / 4 / 75 / 35 / Black

Copy the music and the rose layer of the tube
Paste as a New Layer
Image / Resize / Resize All Layers unchecked / Resize by 55%
Place as my example
Add the same Drop Shadow

Switch the Colour Palette so that your light colour is in your Background Materials and set the Foreground to Null
Type your Foreground – I used Gabriola
Effects / 3D Effects / Drop Shadow 2 / 2 / 62 / 5 / Black

Switch your colours again and turn on your Background Materials
Image / Add Border / Symmetrical  / 1 pixel Background Colour
Then 3 pixels Foreground Colour
1 pixel Background Colour
25 pixels Foreground Colour
 
Select the Wide border with your Magic Wand
Promote the Selection to Layer
Effects / Plugins / AP Lines – Silver Lining / See Below
Ss4
Set the Blend Mode of this layer to Difference and Opacity to 85%
Selections / Select None
Image / Add Border / Symmetrical – 1 pixel Background Colour
3 pixels Foreground Colour
1 Pixel Background Colour
 
Image / Resize / Resize All Layers checked / Resize to 600 pixels wide
Add your artist’s copyright information and licence # if applicable
Add your name and Drop Shadow 2 / 2 / 62 / 5 / Black
Add a pretty corner if you wish, duplicate and Image Flip / Image Mirror
Merge Down and Add the same Drop Shadow and your tag is done
Hope you enjoyed this one

Sunday 16 March 2014

The Offering


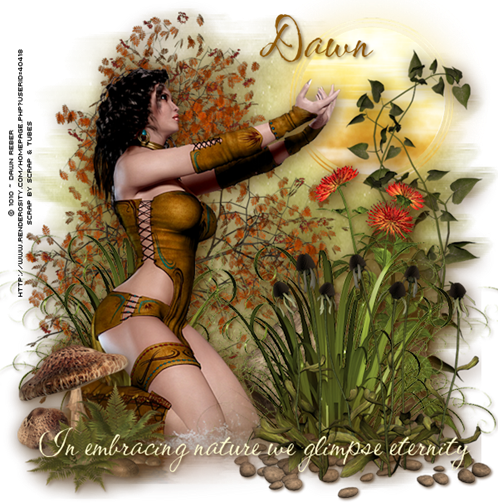
1010~DawnReberTheOffering

This tutorial was written by a WWI group owner and, if there is any similarity or resemblance to any other tutorial, then that is purely a coincidence.  


MATERIAL
I have permission to use the work of 1010 ~ Dawn Reber HERE
Scrap kit – Mysterious Forest FTU from Scrap & Tubes HERE
WSL_Mask260 HERE
Font used CAC Shishoni Brush
 
 
Open an New Transparent Raster Image 700 x 700
Open a New Raster Layer
Selections / Select All
Open your Mysterious Forest Paper 1 and Copy and Paste into the Selection
Selections / Select None
Layers / New Mask Layer / From Image / Find your WSL_Mask55 and Press OK
Merge / Merge Group
Rename this layer Mask

With your Ellipse Tool set on Circle
Set your Foreground Colour to Null and your Background Colour to #ffffff
Draw a circle slightly smaller than the central circle in your Mask layer
Move this layer down under the Mask layer

Layers / Merge / Merge Down
Image / Resize / Resize All Layers unchecked / Resize 45%
Use your Raster Deform / Pick Tool  and on your Tool Options Bar
Set position X to 410 and Position Y to 49
Duplicate this layer
Activate the lower layer
Adjust / Blur / Gaussian Blur / 25
Activate the next layer up and Layers / Merge / Merge Down
Duplicate this layer and set the Blend Mode to Hard Light

Copy your tube and Paste as a New Layer
Resize – I resized mine by 70%
Move down and to the left – see my example for guidance
Effects / 3D Effects / Drop Shadow 4 / 4 / 75 / 35 / #422200

From your Mysterious Forest Scrap Kit copy the following elements and resize as listed
Add Drop Shadow to each layer
as above
Element 9 – Resize 85% Drag Layer Beneath Tube layer and position as in example
Element 6 – Resize 90% Position on the right hand side
Element 8 – 100% – Position on the right over the bottom of Element 6
Element 11 – Resize 70% Position in bottom Left Hand Corner moving this layer up over your tube
Element 18 – 100% – Position on right but under your Element 6 layer
Duplicate this layer and Resize the Duplicate by 85%, place behind your tube
Element 19 – 100% Position on Right under Raster Layer 8
Element 20 – 100% – Place as in my example
Element 26 – 100% – Place as in my example
Element 33 – Resize 60% – Drop Shadow 2 / 2 / 62 / 5 / Colour #422200 Place at the bottom right
Activate your Raster 1 layer
Selections / Select All
Copy Paper 2 from your Mysterious Forest Scrap Kit and Paste into Selection
Selection / Select None
Layers / New Mask Layer / From Image / Find your WSL_Mask260
Merge / Merge Group
Image / Resize / Resize all Layers checked / Resize to 600 wide
Add your artist’s copyright information and your licence# if applicable
Add a credit for the Scrap Kit e.g. Scrap by Scrap & Tubes
Now Add your name in a pretty font with some drop shadow and any word art you choose and your tag is finished!
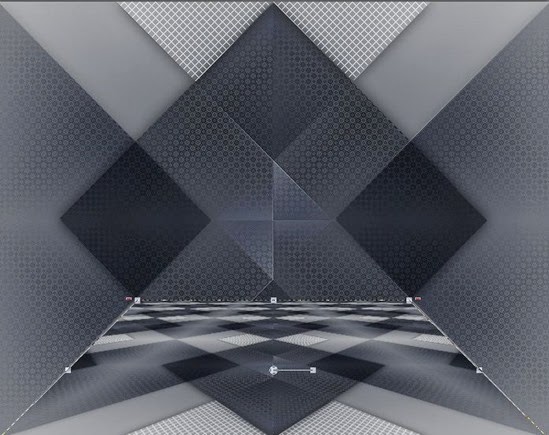
You can add a background of white or just save as a png as it is